I last left off with a
successful tasting that left me with the bigger task: the presentation of the cake. Ever since Stephen and Traci had asked me to do their cake, I had tossed various ideas around in my head, most bordering on the sensational. As the wedding was in Florida, I had this idea for a cake with ocean wave frosting and a boat topper with a bride and groom riding off into the sunset, complete with cans and a "just married" sign hanging off the back of the boat. Uh huh.... I have never done anything like that in my life, so I don't know why I thought I could do that now. I ain't no Cake Boss.
My "simpler" idea was to mimic a photo on their save the date, which was the date of their wedding (10.22.11) drawn in the sand, surrounded by coral chunks and seashells. Didn't seem that hard, but still... what was I thinking? This was a wedding cake, not a 10 year-old's beach-themed birthday cake.
 |
| Their save-the-date on my fridge. Sand heart in bottom left corner. |
My next idea was to do a simple, classic, white wedding cake and mimic the blue floral designs that I knew were going to be on Traci's wedding dress, unbeknownst to Stephen. However, just as I was mulling over this thought a few hours after Traci had left the tasting, I received a call from her. She said she had looked up the Smitten Kitchen frosting recipe I had mentioned when telling her about the cake research and had fallen in love with Smitten Kitchen's final
cake design. Obviously I knew this cake by heart after studying her posts and was therefore ELATED at this news - the design was really simple, just a square, three-tiered cake with pearl button accents and a stream of real orchids (thank GOD, no sugar flowers) running down the side. I instantly felt confident - I knew I could handle that. Also, after Traci's minor freakout when she found out just how massive the dessert bar order was, we decided upon a slightly smaller size - an 8" tier, a 6" tier, and a 4" tier - to avoid dessert OD. A smaller cake was even more manageable for me, and my stress began to dissolve away.
However, the one thing I needed to do still was learn how to stack tiers. I did extensive research on Wilton's website one day, which is a great resource for anything baking. I watched tutorial video after tutorial video on how to how to level a cake, frost it evenly, insert dowels, stack tiers, touch up mistakes, pipe designs, etc. I was then ready for the practice run: a full scale model of the wedding cake.
As construction was my main concern, I didn't want to take the time to bake the actual cake recipe, so I prepared a few spruced-up box mixes in flavors requested by my roommates. I figured since they were going to have to deal with a lot of leftovers - a whole wedding cake, to be precise - they may as well like what they were eating. After calculating cake pan volumes, I figured out that one prepared mix (which was equal to one unit of the raspberry-lemon cake) would make one layer of each tier - so, a 8" cake, a 6", and a 4". So, three cake mixes (or three units of the actual cake recipe). I made a set of chocolate layers (if you want the convenience of a mix but not the taste, I actually recommend this
chocolate cake recipe - it turns out surprisingly dense and delicious), strawberry (white cake mix with strawberries mixed in), and rainbow chip (I HAD to try it after bashing it so much, and I stand by what I said - it's so not as good as Funfetti). I also just bought some frosting canisters for the filling - box mixes don't deserve homemade lemon curd.
 |
| Tiers ready to frost. |
At this point I discovered my new favorite part of cake making: the cake scraps from leveling. In order to get perfect squares, you have to cut off a decent amount of the cake's edges, which leaves you with some delicious snacks. All my roommates were clamoring over the scraps, especially since they saw this cake being baked but couldn't eat it until it was completely constructed, which would be another day.
 |
| Leveled cake - notice the clean-cut sides. |
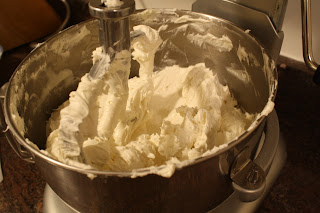 |
| Enormous batch of buttercream. Good thing I got the enormous mixer. |
I prepared a large batch of the Swiss buttercream, and, after leveling, I filled, stacked, and frosted the layers to create the three tiers. I then doweled the bottom two tiers, which was a pretty cool process. I never realized how architectual cakes are. Each tier sits on a cardboard base, and then all the tiers besides the top have hollow plastic dowels in them, upon which the cardboard base sits for support, instead of on top of the actual cake. Then, once all the tiers are stacked, you sharpen a wooden rod (this felt very outdoorsman of me) and drive it through the middle of all the tiers in order to stabilize it. Just frost over the top and voilà, it's magic - no one knows there are all these rods running through the cake to support it.
 |
| Supplies to build. |
 |
| Dowels in place. |
At this point I made a list of things I would do differently on the actual cake:
- Level the tiers as evenly as possible before frosting. On a square cake, especially a smaller one, any deviation from right angles is really noticeable.
- Trim the cardboard bases after leveling but before frosting. I originally tried trimming them after frosting, and it's impossible to do without messing up your smoothing work. Lesson learned.
- Trim the dowels to be flush with the top of the cake. On the practice run they were a little too tall, causing each tier to kind of float above its base. Looks weird and shabby.
- Apply a crumb coat. This will create the smoothest frosting possible with no signs of cake crumbs.
- Add a little melted-and-cooled white chocolate to the frosting to mitigate the taste of butter. I read this in a food blog and thought it was worth trying, since buttercreams can often give the impression of gnawing on a stick of butter. Paula Deen may like this, but the rest of us do not, no matter how much we love butter (perhaps the only instance where more butter isn't necessarily better). However, from the practice run I learned to ensure the white chocolate cools completely after melting before adding it to the buttercream. If it doesn't, upon addition it will seize up from the moisture and coldness of the butter, and the frosting will not smooth easily due to the white chocolate shards.
- Do not refrigerate the frosting. It takes forever to soften the butter in it to a spreadable point again, and if the air temperature is pretty moderate, it's fine sitting on the counter for a few days. However, this also gave me some insight into something else I should do...
- Refrigerate/freeze the cake in intervals and overnight. Seeing how hard the frosting got in the fridge gave me the impression that it would be wise to refrigerate the tiers for a bit in between the crumb coat and the final coat, as well as overnight before stacking. This would allow the crumb coat to capture in all the crumbs and minimize knicking and damage while stacking. I found it extremely difficult to move the cakes even an inch without messing them up in the practice run, and I knew this could not happen on the real thing.
 |
| Tiers with too-large cardboard bases and too-tall dowels. |
I also experimented a little with the pearl button piping design. Ultimately, I just liked evenly spaced out dots, and I knew the orchid stream down one side would steal the show anyway, so I wasn't too concerned. My roommates dug into the leftovers, and I brought the bottom tier into the work breakroom, where it was devoured by 10:30am. I was a little embarrassed how many people were like, "OMG, this wedding cake is awesome!", since I would rather die than serve a Rainbow Chip wedding cake, but oh well - I figured I'd let the final product speak for itself.
 |
| Not a fan of the diagonal stripes. Decided on the bottom design. |
 |
| Practicing some piping patterns. Those balls are a little too big... |
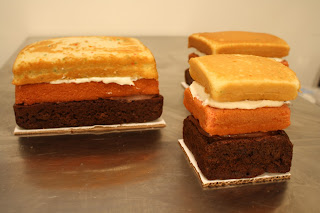
 |
Cross-section of top tier. Neopolitan wedding cake?
|
From there, it was countdown: three days until the REAL THING in Florida!


1 comment:
This is nice, great job right there. It looks very delicious and delicate.
Post a Comment